Patient Chart
athenaOne for Hospitals & Health Systems
The patient chart is always available within the encounter workflow and the hospital visit. The chart content is updated automatically with every patient encounter and hospital visit.
Note: Some features of the patient chart are available only in the ambulatory (athenaClinicals) view, and some are available only in the hospital view. Only the ambulatory (athenaClinicals) view includes the Problems chart tab, the Vitals chart tab, and the Visits chart tab. Only the hospital view includes the Diagnoses chart tab, the Flowsheets chart tab, and the Notes tab.
The patient chart is always available within the encounter workflow and the hospital visit. You can also access the patient chart using the Find patient tool, the Patient Actions Bar, and the hospital Patient List.
Hospital note: To open to the coding view of the chart from the Visit — Billing page, click the Medical Codes item in the visit billing checklist, and then click Open Coding View of the Chart.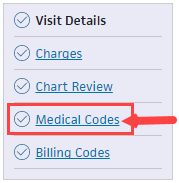
 In the text box at the top right of the Main Menu, enter the first three letters of the patient's last name, followed by a comma, followed by the first three letters of the patient's first name. Click the search icon. On the Find a Patient page, click Chart for the patient you need.
An "empty" image appears when no results are returned.
Click the athenaOne logo in a department that uses athenaOne for Hospitals & Health Systems to display the Patient List, and then click the patient's name in the Patient List. The patient briefing is the "front page" of the chart.
For the ambulatory (athenaClinicals) view:
You must be logged in to a department that uses athenaClinicals, and you must have permission to access and update the patient chart.
For the hospital view:
You must be logged in to a department that uses athenaOne for Hospitals & Health Systems
You must have the Hospital Coder user permission to access the coding view of the hospital chart.
Note: If another user made changes to the patient chart or encounter information since you started making changes, a message at the bottom of the page displays the username of the person who made the changes and the time that the changes were saved. Click REFRESH Chart to obtain the latest updates.
- Click each chart tab on the left side of the screen to expand the section. Click an item to edit it.
- To close a section, click the chart tab again.
After you click a section of the chart to review it, "Reviewed" appears at the bottom of the section. (athenaOne marks a section as "Reviewed" only if you scroll to view the entire section.)
The "Reviewed" note also appears in the Full Encounter Summary.
Note: If a section in the chart is incorrectly marked as reviewed during the encounter workflow, you can open the section and click the "Reviewed" text to change it to "Not Reviewed." Marking a section as not reviewed also removes the "Reviewed" notation from that section in the Full Encounter Summary or removes the entire section (if it is blank). - In the Problems section, you can toggle between ACTIVE and HISTORICAL problems, and click the flowsheet icon
 to view the flowsheet and related diagnosis notes.
Tip: In the Problems section, you can sort problems in the default view or drag problems to customize the sort order. - Click the Medications tab to review alerts or familiarize yourself with the patient's current medication list.
- Click the Results tab to review any labs you need to discuss with the patient when you begin the Exam stage.
- Click the result status to expand the details.
You can also click the flowsheet icon to view more lab details. Click the left arrow icon
  to collapse the detailed view.
 - Click IMAGING RESULTS.
- Results are listed with four parts: test name, date, text, and image or attachment indicator.
- The following fields appears: Interpretation, Internal Notes, Results text.
- "Image available" appears when a linked image is available.
- "Attachment available" appears when the result has an attachment that is not categorized, such as a fax image, integrated device image, or uploaded file.
- Click the view more icon
 to view the result details.
- You can review vaccines, vitals, past visits and cases, a patient's history, or quality measures.
- Visits — You can access open and closed encounters in the Visits section of the chart.
- History — You can add surgical history questions and manage past medical history questions.
- Quality — Quality measures that need attention are indicated by the orange vertical bar. The relevant fields are highlighted to remind you to complete the actions required to fulfill the measures.
Note: The alerts disappear when you take the necessary actions, indicating you have satisfied the measure.
When you search for a document using the Find tab  of the patient chart, you see the first two lines of any internal notes related to the document. If no internal note exists, athenaOne displays the clinical paper form name instead. Encounter documents are the only exception to this rule because athenaOne already displays the clinical paper form name as the title of these documents.
Tip: You can search for lab order documents by their receiver specific name (clinical provider order type name).
- Display the patient chart:
 In the text box at the top right of the Main Menu, enter the first three letters of the patient's last name, followed by a comma, followed by the first three letters of the patient's first name. Click the search icon. On the Find a Patient page, click Chart for the patient you need.
 - In the patient chart, click the Find tab
 at the top of the list of chart tabs on the left side of the screen.
 - Enter search criteria in the text box, or click the Type option to display the list of documents grouped by classification.

Note: Only classifications for which the patient has documents appear in the browse view. For example, if the patient has no Patient cases, that category does not appear. - Click the document classification to expand that group.
Note: The documents within a classification are sorted by date (most recent documents at the top). - If available, click the document's sub-classification to further expand the browse view.
- Click the document name to view it.
- Search for and open any other documents that you want to display.
athenaOne creates a new tab for each document and keeps all documents open until you close them or leave the patient chart. You can click a tab to display that document, close a single document tab, or close all open tabs at once.
Note: You can open as many document tabs as you want, but you cannot open two copies of the same document.
- Display the patient chart:
 In the text box at the top right of the Main Menu, enter the first three letters of the patient's last name, followed by a comma, followed by the first three letters of the patient's first name. Click the search icon. On the Find a Patient page, click Chart for the patient you need.
 - In the patient chart, click the Find tab
 at the top of the list of chart tabs on the left side of the screen.
 - Type the word "deleted" in the search box.
Any deleted documents appear in the search results.
- In the patient chart, click the Results tab.
- Click a result with a historical document.
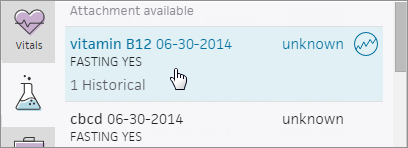
- Click VIEW ALL to display the results.
- Click the view more icon
 .
.
The historical document appears. - To view the most recent document, click the flowsheet icon
 , and then click DOCUMENT to access the document view.
Providers can send electronic messages via athenaOne to pharmacies in the Surescripts network to cancel a prescription change. If you already send prescriptions electronically in athenaOne, you can use this feature.
Note: To request prescription changes and receive prescription cancellations, pharmacies must be enabled on the Surescripts network and be certified by Surescripts for change and cancel transactions.
![]() For a demonstration, see this video: How to Cancel a Surescripts eRX Electronically.
For a demonstration, see this video: How to Cancel a Surescripts eRX Electronically.
When you cancel a prescription, the medication is also removed from the patient's medication list. If the prescription was partially or entirely dispensed, a message alerts you to that fact.
Note: You cannot cancel a prescription that was entirely dispensed.
- Display the patient chart and click the Find tab
 at the top of the list of chart tabs.
- Click the Type option to display the list of documents grouped by classification.
- Click Prescription.
- Click New.
- Click the medication that you want to cancel to open the document.
- In the document view, click view actions.
- Click Cancel.
- Click Save.
The prescription, including all remaining refills, is cancelled.
- In the patient chart, click the Menu icon
 .
. - Select Create order group.
- Search for and select the rendering provider.
The Order Group page appears. - Ordering Provider — Select the ordering provider.
- Supervising Provider — If you require a supervising provider when you create orders, select a supervising provider.
Note: If you previously assigned a supervising provider, that supervising provider is the default choice. - Click
 .
. - Select the order set or diagnoses and orders for this order.
- To record an onset date for a diagnosis, click the diagnosis to expand it and reveal the Onset field. Enter or select the onset date of the patient's symptoms.
- Enter the order details in the fields provided.
- For multiple orders, click each additional order to expand it and enter the order details.
- Click
 to add a follow-up RTO (appointment tickler) if needed.
 - Click
 to add a letter to the order, if needed.
 - Click the Sign Orders button.
The order group is added to the list of cases in the Visits section of the patient chart.
- In the patient chart, click the Menu icon
 and select Print chart sections.
Note: You can also print chart sections from the Intake or Exam stage of an encounter. - Select the section to print:
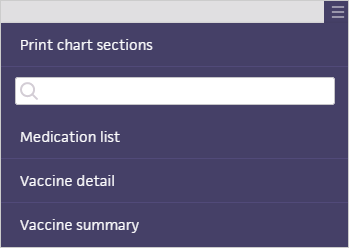
- Medication list — A list of all medications for the patient.
- Problem list — A list of all problems associated with the patient.
- Vaccine detail — A list of all vaccines for the patient, including detailed information about each vaccine administered.
- Vaccine summary — A list of all vaccines containing only name and date of administration.
The section appears in a new window.
- Click Print.
- In the patient chart, click the Menu icon
 and select Print forms.
Note: You can also print forms from the Intake or Exam stage of an encounter. - Select the forms that you want to print. You can use the search box at the top of the list to locate the forms you need.
Tip: You can click Reset selection to deselect the forms.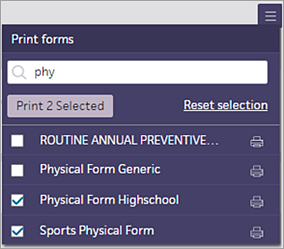
Note: To display a form before you print it — for example, if you want to make sure that you're printing the correct form — click the name of the form (not the printer icon) to open the form in a new window. All input fields are read-only when previewing a form. - Click Print [#] Selected to print the forms you selected.
athenaOne prepares the PDF document; the print status icon shows you the progress of the print job. For more information about the print job statuses for success, failure, and errors, see Printing athenaOne Pages.
 - After you review the generated PDF document, click Print.
Note: If you receive an error message while printing forms, click Print [#] Selected again to print the documents.
- In the patient chart, click the Menu icon
 and select Add document.
The Add Document window opens. - Select an option such as Scan paper documents or Upload files from computer or network.
- Document class — Select a document class from the menu.
Note: If you do not select an option from the Document class menu, the class defaults to "unknown." See Document Classifications for more information about document types and document processing. - Click Select File and locate the file on your computer.
- To upload more than one file to a chart, click Select File again. You can add up to five files at one time.
- Complete the document scan or upload workflow, and click Add Document.
A message tells you that your files are being processed. (You can do other work in athenaOne while the files are being processed.) - After the documents are uploaded and attached to the patient chart, you can process them using the Process Document page.
Note: If you added more than one document, you can click Save and Next to process the next uploaded document.
- In the patient chart, click the Menu icon
 and select Add document.
 - Document Class — Select a prescription document type.
- File — Click Choose File and select the document.
- Click the Create button.
- Enter as much information as possible about the medication, including the medication name.
- Actions — If you select Send to HOLD, the document remains in HOLD status.
- Click Save.
- Click view actions.
- If you select Close, the document changes to CLOSED status.
- Click Save.
The medication appears in the patient's medication list and in the Recent Activity section.
You can also access the document in the Search menu and in document review of the Exam stage.
You can export a patient's chart data by selecting the data to export in a printable format, or by exporting all data into a Continuity of Care Document (CCD) file. Your practice must have the Chart Export feature enabled to export patient chart data.
To export chart sections
- In the patient chart, click the Menu icon
 and select Chart export.
The Chart Export window appears. This window has these sections: Chart Sections, Continuity of Care Document, and Patient Record Creation History.
Note: You can click each section to expand it or collapse it. - Date Range — You can select the date range from the menu or specify the dates in the From and To fields.
Note: The default date range, Year-to-Date, displays a From date that corresponds to the first day of your organization's fiscal year. - Formal Health Record — Select this option to export the documents and parameters that should be used when generating a patient's official medical record. athenaOne automatically moves the selected items to the Selected Attachments section.
- Include Confidential Patient Information — Select this option to include in the chart export information from the Confidential section of the Patient Demographic Information.
Note: This option is not available if you selected the Formal Health Record option. - To select the sections of the patient's chart that should appear in the export, select items in the Available Attachments section and click the right arrow icon
 .
.
Items displayed in bold with a number in parentheses contain information. Items shown in gray italics with (0) do not contain any information for the patient.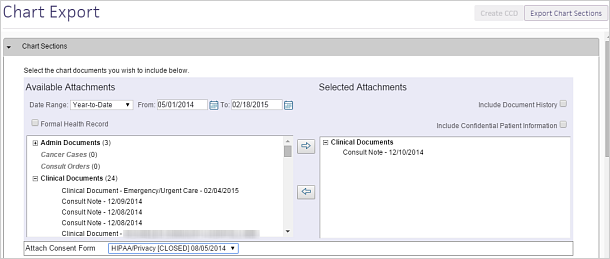
- Attach Consent Form — Select a consent form to include in the export.
- Click Export Chart Sections.
A preview of the exported data appears.
To export a Continuity of Care Document
-
In the patient chart, click the Menu icon
 and select Chart export.
The Chart Export window appears, displaying three sections: Chart Sections, Continuity of Care Document, and Patient Record Creation History..
Note: You can click each section to expand it or collapse it. - Click the Continuity of Care Document section to expand it.
Note: Unless the CCD format is specifically needed, athenahealth recommends that you send a CCDA document instead. - Click Create CCD.
athenaOne automatically retrieves the appropriate data from the patient's chart, based on the most recent encounter.
A new window appears. You can view or save continuity of care documents in .xml format. -
To share the exported data, you can:
-
Send to — Search for and select the receiving provider.
The Direct field appears if the provider has a Direct address.
Note: If this field does not appear, the selected recipient does not have a Direct address. Consequently, Direct Messaging cannot submit the CCD. The CCD goes to the sender’s inbox in REVIEW status. -
In the patient actions bar at the bottom of the page, click Submit and select one of the following methods:
-
By Direct — To send the file to the receiving provider using Direct Messaging.
-
By electronic file — To send the file electronically to a receiving provider that uses athenaOne, using a secure means (such as encrypted email).
-
Repository — To burn the file onto a disc (preferred) or thumb drive (less secure) and give it to the patient, who can deliver it to the receiving provider.
-
-
Click Save.
-
To view the Patient Record Creation History
-
After you click Export Chart Sections or Create CCD, you can see a list of previous chart exports in the Patient Record Creation History section of the chart export. Click the view links to see Chart Documents and Continuity of Care Documents.
You must have the Clinicals: Encounter Sign-off user permission to amend a closed encounter.
Whenever possible, close encounters only after you complete documentation. If you need to edit or add information to an encounter after it is closed, we recommend that you amend the encounter as soon as possible so that you can edit it using the encounter workflow.
You can use the encounter workflow to amend an encounter if no sections were modified after the encounter was first closed.
Display the closed encounter
- Click the closed appointment in the schedule, or you can:
- Click the patient's name in the schedule to display the patient briefing.
- Click the Visits chart tab to open the Visits and Cases section of the patient chart.
- Click the view more icon
 next to the encounter that you want to amend.
 - Under the Summary heading, click EDIT encounter.
- In the upper right corner, click the down arrow next to Done and select Amend Encounter.
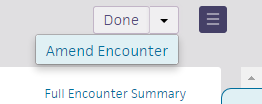
The Document step of the Sign-off stage appears, with the encounter ready for amendment.
Make changes to the encounter
- Document your amendment.
- Click Close Amendment.
The home page appears. A banner appears notifying you that you have completed sign-off for the encounter.
Important: The updates that you make to chart sections while amending the encounter are not reflected in the patient chart after you close the amendment. After you amend an encounter, you must open the patient chart and make the same edits.
Display the closed encounter
- Click the closed appointment on the schedule, or click the patient's name in the schedule to display the patient briefing.
- Click the Visits chart tab to open the Visits and Cases section of the patient chart.
- Click the view more icon
 next to the encounter that you want to amend.
 - Under the Summary heading, click go to encounter.
The closed encounter view appears.
Open the full encounter summary
- In the upper right corner, click the arrow next to Done and select Amend Encounter.

The full encounter summary re-opens for amendment. - Click the section to edit.
A new window appears with either the structured or free-text version of the section. You can use the format buttons at the top of the free-text section to bold, italicize, and add bulleted or numbered lists. - Make the necessary edits and click outside the section to save.
Note: Some sections may require a manual save. To ensure that your edits are saved, click the Save button in the top right corner.
The summary view is updated to reflect your changes. - After you make your edits, review the encounter summary to ensure that the amendment is accurate.
- Click the Close Amendment button.
The home page appears. A banner appears notifying you that you have completed the Sign-off stage for the encounter.
Important: The updates that you make to chart sections while amending the encounter are not reflected in the patient chart after you close the amendment. After you amend an encounter, you must open the patient chart and make the same edits.
After you close an amendment, your updates are reflected in the full encounter summary and in the Visits section of the patient chart. The Use for icon no longer appears next to the sections that were amended in free-text mode in the Visits section. If you import the entire previous encounter to today, no amended sections appear (to avoid the propagation of incorrect information).
Note: If you added orders to the Assessment & Plan as part of your amendment, and those orders are missing required information, the button appears with an orange vertical bar. If this occurs, go back and address any items that require attention and then click the Sign & Close Amendment button.
When you view a full encounter summary for an encounter that has been amended, the latest amendments are displayed by default.
To view the original encounter summary without changes:
- In the patient chart, click GO TO ENCOUNTER in the Visits tab of the patient chart.
- Click Full Encounter Summary.
- Clear the View Changes checkbox.
- In the patient chart, click Recent Activity.
- Click Filter to filter the recent activity.
- Select a Date Range for the activity.
- Check Clinical Documents then check which type:
- Internal Documents – Show documents that are already saved in the patient chart.
- External Documents – Show patient record sharing documents from CommonWell and Carequality that are not yet integrated into the patient chart.
- (Optional) Click Set as Default Filter if you want your current selection to be the default when you view recent activity.
- Click Show Activity.
- Click the patient's name in the schedule or in the Clinical Inbox list of encounters.
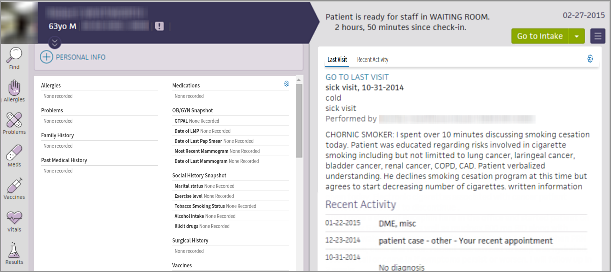
- Click the view more icon
 in the patient banner to expand and review patient demographic information.
- Display the patient chart.
- Click the settings icon
 in the upper right of the patient summary.
The Configure Patient Summary window appears.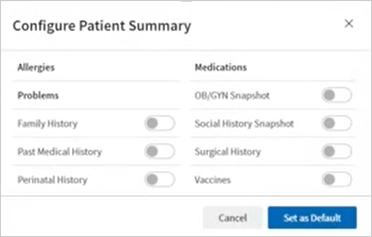
- Toggles sections on and off as desired.
- Click Set as Default.
athenaOne applies your selections to all patient charts that you open.
- Display the patient chart.
- Click Recent Activity.
- Click the filter icon
 .
. - Choose which information to include:
- Date Range — Select a time period.
- Types — Select the types of information you want to see.
- To apply these filters whenever you open a patient chart, click Set as Default Filter.
- Click Show activity.
Note: Your practice must have the Expedited Encounters feature enabled.
- In the patient chart, click the Menu icon
 and select New encounter.
Note: The first time you create an expedited encounter for a patient, the Check-in page appears, so that you can complete the required fields. Subsequently, when you create an expedited encounter for this patient, the Intake stage appears. (The Check-in stage reappears if any required fields are missing.)
Check-in
- Appt type — Select the appointment type for the visit.
- Scheduling provider and Rendering — If you are a provider, these fields default to your username. If you are not a provider, select a provider for each field. (The selected providers remain set until you change them.)
- Follow the prompts to complete the required fields.
- Click Save or Done with Check-in.
The appointment you just created appears on the list of appointments in the schedule and in the Today's Appointments worklist.
Encounter workflow
- Begin the encounter workflow.
Note: Exam templates — such as the History of Present Illness Templates, Review of Systems Templates, and Physical Exam Templates — can be configured for male or female patients only. If your practice does not require the patient's gender/sex to be specified as part of patient registration or the check-in process, some of your exam templates may not be available when you see patients in an expedited encounter.
Note: To follow these steps, your practice must have the Expedited Encounters and Deferred Insurance feature enabled. Billing staff must monitor the Missing Insurance worklist daily to update any patient encounters with deferred insurance.
If you are a provider examining a patient who does not have a patient record in athenaOne, you can register the patient yourself: On the Main Menu, click Patients. Under PATIENT REGISTRATION, click New Patient Registration, enter the required information in the yellow fields, and click Save. After the patient is registered, follow these steps:
- In the patient chart, click the Menu icon
 and select New encounter.
Note: The first time you create an expedited encounter for a patient, the Check-in page appears. If the patient does not have insurance information entered, a message appears. - Click Defer insurance. The Check-in page appears.
Follow the instructions at the top of the Check-in page to complete the required fields
- Appt type — Select the appointment type for the visit.
- Scheduling provider and Rendering — If you are a provider, these fields default to your username. If you are not a provider, select a provider for each field. (The selected providers remain set until you change them.)
- Follow the prompts to complete the required fields.
- Click Save or Done with Check-in.
The appointment you just created appears on the list of appointments in the schedule and in the Today's Appointments worklist.
Encounter workflow
- Begin the encounter workflow.
Note: Exam templates — such as the History of Present Illness Templates, Review of Systems Templates, and Physical Exam Templates — can be configured for male or female patients only. If your practice does not require the patient's gender/sex to be specified as part of patient registration or the check-in process, some of your exam templates may not be available when you see patients in an expedited encounter.
To see today's schedule when you are working in a chart or encounter, click the calendar icon in the status bar at the bottom of the page. The schedule closes when you resume your work.
![]()
The users and departments displayed in the schedule match your selections on the clinician home page.
When you open more than one document in a patient's chart, athenaOne creates a new tab for each document and keeps all documents open until you close them or leave the patient chart.
Regardless of how you open a document in the patient chart — using the patient document search, clicking a link in a document to open another document, or creating a patient case — you can display, close, and reorder tabs as follows:
- To display a different tab, click the tab that you want to view.
Note: If you have a large number of open tabs, you see left and right arrows that you can use to scroll from tab to tab. - To reorder the tabs, click and drag the tab labels.
- To close a tab, click the X on that tab.
- To close all open tabs, click the X at the far right of the page.

Note: You can open as many document tabs as you want, but you cannot open two copies of the same document. If you leave the chart, athenaOne automatically closes all open documents.
In the encounter workflow, you can click the Menu icon ![]() at the upper right corner of the page to display the following menu options:
at the upper right corner of the page to display the following menu options:
- Quickview — Opens the patient's Quickview
- Create patient case — Opens the patient case workflow
- Create order group — Opens the order group workflow
- Print chart sections — Select chart sections to print
- Print forms — Select forms to print
- Add document — Opens the add document workflow
- Chart export — Opens the chart export workflow
- Audit history — Displays audit history information
You can filter clinical documents in the Recent Activity section of the patient chart.
The filter makes it easier for you to locate documents that are most important to the care team.
- Internal Documents – Are already saved in the patient chart, such as these documents that have been scanned into the chart:
- An assessment note a specialist faxed to you
- A hard copy of an MRI interpretation the patient handed to you
- External Documents – Are patient record sharing documents from CommonWell and Carequality that are not yet integrated into the patient chart.
There are four types of documents:- Hospital encounter
- Emergency
- Office visit
- Encounter summary
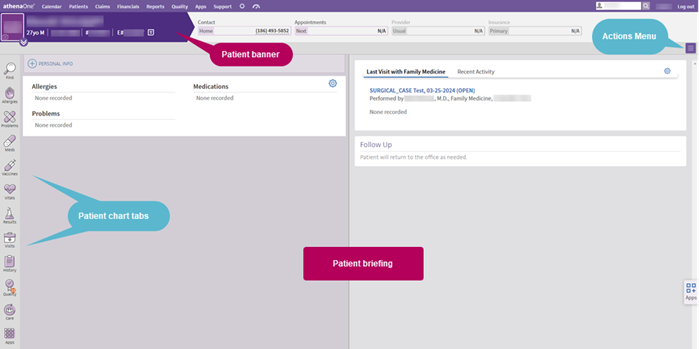
The patient chart has a patient banner showing demographic information, a current clinical briefing, an Action menu, which provides quick links to the most common actions, and chart tabs down the left side of the screen. Click a chart tab to view the content in that section.
You can choose to see these additional sections in the patient summary area of the patient briefing:
- Family History
- Medical problem
- Relatives who have had this medical problem
- Past Medical History
- Medical problem
Note: Only past medical history questions that were answered YES appear in this section. - Internal note
- Medical problem
- Perinatal History
Note: This information appears only if the patient is 3 years old or younger.- Medical problem
- If Unremarkable is selected
- Internal note
- OB/GYN Snapshot
Note: This information appears only if your practice has configured these fields to appear in the OB/GYN History section of the patient chart, the patient's assigned sex at birth is female, and the patient is 8 years old or older.- GTPAL
- Date of LMP
- Date of last pap smear
- Date of last mammogram
Note: A summary of the results appears under this field. - Most recent mammogram
Note: A summary of the results appears under this field.
- Social History Snapshot
Note: This information appears only if your practice has configured these fields to appear in the Social History section of the patient chart and the patient is 8 years old or older.- Marital status
- Exercise level
- Tobacco smoking status
- Alcohol intake
- Illicit drugs
- Surgical History
- Procedure
- Date of procedure
- Internal note
- Vaccines
- Vaccine name
- Administration date
You can choose whether Last Visit or Recent Activity appears by default when you open any patient chart.
- Display the patient chart.
- Click the settings icon
 in the upper right of the Last Activity section.
The Set Default Tab window appears.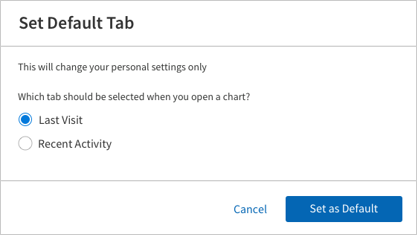
- Select Last Visit or Recent Activity.
- Click Set as Default.
athenaOne applies your selection to all patient charts that you open.

The patient banner includes:
- Patient name with last name in uppercase.
Note: If a value is entered in the First name used field, the patient banner displays the first name used in the first position of the patient banner, with the legal first name displayed in the Legal name field. - Patient age and date of birth. (For patients 5 years old and younger, the age is displayed using years, months, and days, for example "3m12do" and "2y5mo.")
- athenaOne ID for the patient, preceded by a pound sign (#)
- Chart alert icon
 . (If there is an alert, the icon is yellow
  .)
.) - Selected patient demographic information.
Note: For information about demographic information displayed for transgender and nonbinary patients, see Transgender and Nonbinary Patient Care. - OB episode information: gravidity and parity, duration of pregnancy expressed as "weeks.days," estimated date of delivery (EDD), and blood type. This information appears if an OB episode was added to the patient chart.
Note: If your practice has different chart sharing groups, the OB episode information appears only when viewing the patient chart with the open OB episode.
Click the view more icon  to view additional demographic information.
The following demographic fields always appear. (If no data is available for any of these fields, "None recorded" appears.)
- Portal status — The patient's Patient Portal access status (registered, not registered, inactive; if registered, date that the patient last logged in to the Patient Portal). To register the patient or a family member for the Patient Portal, click Manage Portal Account.
- Contact — Includes any of the following:
- Patient home, mobile, and work phone numbers
- Patient address
- Emergency contact name and phone
- Guarantor name, address, and phone
- Guardian name (If a preferred method of contact is recorded for the patient, that method appears first in the list)
- Insurance — All medical and prescription insurances.
- Care team — The patient's providers.
- Pharmacy — The patient's default pharmacy
 and preferred
  pharmacies. Click the plus icon
  to add a pharmacy, or click the X icon
  to delete the selected pharmacy.
 - Lab — The patient's preferred lab. Click the plus icon
 to select a preferred lab facility, or click the X icon
  to delete the selected facility. Only one lab is saved in the patient banner.
 - Imaging — The patient's preferred imaging facility. Click the plus icon
 to select a preferred imaging facility, or click the X icon
  to delete the selected facility. Only one imaging facility is saved in the patient banner.
Note: If a patient has no default pharmacy, lab, or imaging facility, the first pharmacy, lab, or imaging facility selected when an order is created becomes the default pharmacy, lab, or imaging facility and is displayed in the patient banner. You can edit these defaults in the patient banner, if needed.
The following fields appear only as noted:
- Language — This field appears only if the language recorded for the patient is not English.
- SSN — This field appears only if this information is recorded for the patient (only the last 4 digits are displayed in the patient banner).
- Patient Privacy — This field appears only if this information is recorded for the patient.
- Occupation — This field appears only if this information is recorded for the patient.
Note: You must go to Full Registration to enter and view Occupation and Employer information. In the Social History section of the Patient Chart, you can access an info icon that displays a link to Full Registration.
You can add a text alert to a patient chart to alert staff about special precautions that they should take when scheduling, rooming, and caring for specific patients. Examples include patients who are immuno-compromised, have physical or mental impairments, or who may need other special accommodations.
To add and edit chart alerts, you need the Chart Alert: Edit permission. This permission is included in the Superuser, Clinicals, and Receptionist roles by default.
- In the patient chart, click the alert icon
 in the patient banner at the top of the page.
The alert text box appears. - Enter the text of the alert in the text box and then click outside the box.
The chart alert is saved and the icon is now yellow ( ).
). - To edit the chart alert, click the icon, edit the text, and then click outside the box.
Note: To see the audit history of the alert, display the patient's Quickview, click the alert icon, and then click Audit history. - To delete an alert, click the icon, delete all the text in the box, and then click outside the box.
The alert icon turns purple again ( ).
).
If a patient is part of a payer risk contract, such as an accountable care organization (ACO), the patient banner displays a Risk Contract flag in the patient chart and during all stages of the clinical workflow, including scheduling, Intake, and Exam.

athenaOne retrieves this information from athenahealth Population Health and displays it in athenaClinicals. This information helps alert clinicians when additional care management resources may be available to the patient. The status is updated on a monthly basis to display any risk attribution changes.
The Risk Contract flag appears only for patients who have records in both athenaClinicals and athenahealth Population Health. Your organization must use both athenaClinicals and athenahealth Population Health or an affiliate's practice must use athenahealth Population Health. An EMR feed from athenaClinicals must be implemented in athenahealth Population Health for patients to match across systems.
Note: To use this feature, please contact a member of your athenahealth Population Health Customer Success Management team.
The briefing shows the story of the patient at a glance, highlighting the most critical information at the point of care. It provides lists of chart alerts, allergies, problems, and medications (sorted alphabetically) on the left, and a summary of the patient's last visit and recent activity on the right. The right side of the page displays a summary of today's visit, recent activity, and what happened the last time the patient visited the practice.
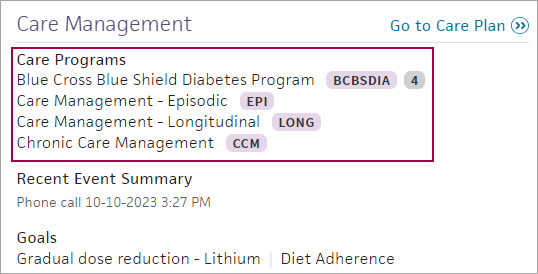
This section lists the care programs a patient is a part of, the patient's recent event summary, and the patient's goals.
The Care Management section displays each care program along with the program's abbreviation:
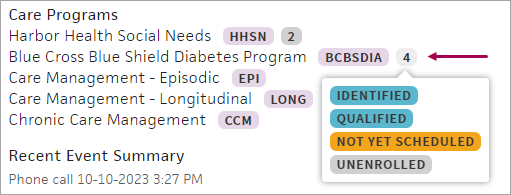
You can also see the patient's enrollment statuses for each care program. Hover over the number of statuses beside the abbreviation for more details:
You can display an existing care plan for the patient from the patient briefing.
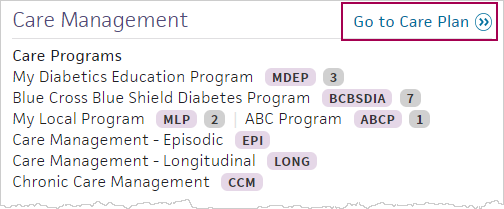
Click Go to Care Plan to display the care plan.
For information about creating and editing a care plan in athenaClinicals, see athenaClinicals Care Plan.
The Last Visit tab shows the most recent encounter with the current rendering provider, if applicable; otherwise, the Last Visit tab shows the most recent visit at your practice.
With the multispecialty feature enabled, when you view the chart briefing in an encounter, the Last Visittab shows one of the following (in order):
- Most recent encounter with the current rendering provider
- Most recent visit with a provider who shares the rendering provider's specialty
- Most recent visit in any of the specialties selected in the "Default specialty view" User Preference setting of the rendering provider
- Most recent encounter at your practice
If you are viewing the patient's chart outside an encounter, athenaOne recognizes your role and specialty:
- For providers, the most recent visit from the following appears:
- The patient's last visit with the user.
- The patient's last visit with a provider who shares the same specialty as the user.
- The patient's last visit with any of the specialties selected in the "Default specialty view" User Preference setting.
- For non-providers, the following appears:
- The patient's last visit with any of the specialties selected in the "Default specialty view" User Preference setting.
- If none of these is available, the patient's last visit at your practice appears.
Note: If the last visit displayed is not the current user's and there is a past encounter with the current user, then a VIEW MY LAST VISIT link appears.
This section lists signed orders for labs, imaging, vaccines, durable medical equipment (DME), surgery, procedures, and referrals. The Outstanding Orders section displays orders to be performed on or before today's date, up to 1 year prior to today's date.
This section lists orders for labs, imaging, vaccines, durable medical equipment (DME), surgery, procedures, and referrals that are scheduled to be performed in the future, after today's date.
This section of the patient briefing lists recent encounters, clinical documents, patient cases, and lab/imaging results, including:
- Encounter documents not in PEND status, associated with the current date or the current encounter.
- Patient encounters that occurred after the last visit with a provider in the same specialty as the current appointment's rendering provider.
Note: This feature applies only to multispecialty practices. Your practice must have the Multispecialty Filtering feature enabled. - The following order types: prescriptions, physician authorizations, vaccines, DME, surgery, corrective lens.
Note: No documents in PEND status appear. - Hospital discharge documents receiving through patient record sharing.
Click a document to display its details. Click the X icon ![]() to collapse the details.
to collapse the details.
For a single specialty practice, this section displays documents from the day after the patient's last visit through the current date.
If your practice has the Multispecialty Filtering feature enabled, this section displays documents from the day after the patient's last visit in the user's specialty, if available, through the current date. If the user's specialty isn't available, the section displays documents from the day after the patient's last visit at the practice through the current date.
Note: All result documents that aren't closed appear, regardless of the date range, to ensure that you have full visibility of a patient's results.
Review patient demographics
- Click the patient's name in the schedule or in the Clinical Inbox list of encounters.

- Click the view more icon
 in the patient banner to expand and review patient demographic information.
Review patient documents
- Click the Find tab
 in the patient chart to search for documents associated with the patient.
Note: From the Intake stage, you can click the Search icon in the patient banner to search for documents associated with the patient.
Review chart alerts
- If the chart alert icon
 is yellow, click the icon to view chart alerts.
Review briefing information
- In the left-hand pane, review the read-only views of the Allergies, Problems, and Medications sections.
Note: You can add more sections to the left-hand pane of the briefing by clicking the settings icon in the top right corner. See also: To configure the patient summary on the patient briefing.
 - In the right-hand pane, review Last Visit or Recent Activity information.
Review relevant chart sections
- Click the chart tabs at the left to access the sections of the patient chart to review pertinent details. Click an item to edit it.
Tip: You can sort problems in the default view or drag problems to customize the sort order. - After you click a section of the chart to review it, "Reviewed" appears at the bottom of the section. (athenaOne marks a section as "Reviewed" only if you scroll to view the entire section.)
The "Reviewed" note also appears in the Full Encounter Summary.
Note: If a section in the chart is incorrectly marked as reviewed during the encounter workflow, you can navigate to the section and click the "Reviewed" text to change it to "Not Reviewed." Marking a section as not reviewed also removes the statement from that section in the Full Encounter Summary or removes the entire section (if blank). - When you finish reviewing the briefing, click Go to Intake to start the Intake stage of the encounter.
Note: If another user made changes to the patient chart or encounter information since you started making changes, a message at the bottom of the page displays the username of the person who made the changes and the time that the changes were saved. Click REFRESH Chart to obtain the latest updates.
- In the briefing, click the Menu icon
 and select Audit history.
The Audit History box appears. - Click each section to expand and collapse it.
- Click outside the box to close it.
During a patient encounter, you can click a chart tab to review and update the information in that section.
The patient chart timeline displays a comprehensive view of the patient's medical history — including appointments, test results, and medications — in chronological order.
The patient chart timeline aggregates information from various sections of the patient chart and arranges the data by time. You can view the timeline alongside an open exam to see the most recent activities related to a patient's care.
Data in the timeline is updated dynamically. As you document an encounter or update the patient chart, the timeline reflects these changes. You can see when an order's status changes and when test results are received, and you can see the results, too.
To access the patient chart timeline:
- Display the patient chart.
- Click the Find tab
 at the top of the list of chart tabs.
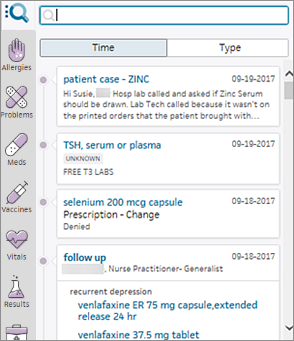
- If the Type option is selected, click the Time option.
- Scroll down to an item in the timeline.
- From the patient chart timeline, you can:
- Check the status of orders.
- Click the title of an encounter or order group to display the full summary of the encounter or order group.
- Click the title of an order, result, or document to display the document view of the order, result, or document.
The patient chart timeline shows only information that is already in the patient chart (that is, information in the patient chart for your chart group and tablespace). This information includes documents containing clinical information and results that you received and downloaded from organizations outside your practice using patient record sharing.
You can see the following information, arranged by time:
- Encounters (if check-in is complete).
- Orders.
- Results.
- Documents of all types.
-
Summary of care records sent to consulting physicians.
- Patient communications (patient cases).
The following information is excluded from the patient chart timeline:
- Patient Care Summary letters given to patients.
- Documents received by your practice that are not related to a specific patient.
- Non-clinical documents with the SHAREABLE document class that are received via athenaCoordinator, such as appointment scheduling requests.
- Documents received but not downloaded from patient record sharing.
Note: Documents may be available for download in the Type view of the Find section. After you download a document, it appears in the timeline view (see "To download and reconcile a patient record sharing document").
Encounters, orders, results, and documents (including letters) appear in the timeline as follows:
- Grouped by encounter or order group — Items are grouped by encounter or order group, and the title of the encounter or order group remains visible as you scroll through the list of items associated with it.
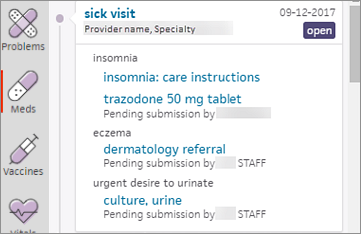
- As separate events if received via fax or upload — Items not created in an encounter or order group appear as separate events.

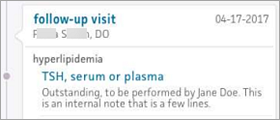
- At date ordered and date performed — Future scheduled orders and standing orders created within order groups and encounters first appear in the timeline at the date they are to be performed. These orders appear again at the date that they were performed.
To view the audit history of the patient chart or encounter, click the Menu icon ![]() at the upper right corner of the page and select Audit history.
at the upper right corner of the page and select Audit history.
The Audit History box appears.
Updates are categorized by Patient Chart and Encounter. Any deleted items appear under the Deleted heading for each section.
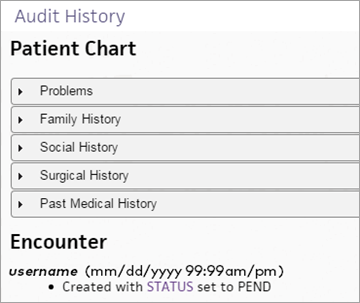
Allergies appear in the audit history if you selected the Delete (added in error) option when you deleted the allergy. Otherwise, they appear in the Historical Allergies list in the patient chart.
Medications appear in the audit history if you selected the Delete (added in error) option when you deleted the medication. Otherwise, they appear in the Historical Medications list.
Note: The Delete (added in error) option appears only if you add the medication directly to the chart (rather than by entering an order in athenaOne).
Note: You must have a nursing role to add a shift note for a patient. Shift notes are labeled according to your provider type.
- In the patient's chart, click the arrow in the green workflow menu (at the upper right) and select Add Shift Note. (The options available in the green workflow menu depend on your user role.)
- Note/Assessment — You can click the plus icon
 to select an assessment template to document the patient assessment.
You can also enter a free-text shift note in the field provided to document the patient's status during the shift.
Tip: To save the note as a shift note template, click the star icon, enter a name for the new note, and click Save.
- To include the most recent vitals in the note summary, check Include vitals in summary.
- Click Next.
- Review the note Summary.
- Click Sign Note.
Note: The timestamp appears just below the Sign Note button.
You can click the timestamp to update the date and time, provided that the date you enter is within 30 days of the current date. When you update a timestamp, the note is marked "Late entry."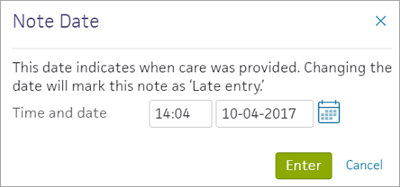
You can delete a note before you sign, but you cannot delete unsigned notes. 
Progress notes use the SOAP structure: Subjective — Objective — A&P — Summary.
Physicians can use the A&P section to enter and sign new orders, right from the progress note.
Progress notes are labeled according to your provider type.
- On the patient's chart, click the arrow in the green workflow menu (at the upper right) and select Add Progress Note. (The options available in the green workflow menu depend on your user role.)
The Subjective stage of the add progress note workflow appears.
Subjective
- Enter subjective information and click Next.

Tip: To save the note as a progress note template, click the star icon, enter a shortcut name for the new template, and click Save. To use a previously saved template, enter a "." followed by the shortcut name wherever the star icon appears.
The Objective stage appears.
Objective
- Under Vitals, the Include vitals in summary checkbox is checked by default, showing all vitals recorded in the last 36 hours for the patient. You can uncheck to exclude vitals.
- Under Recent Labs, the Include recent labs in summary checkbox is checked by default, showing all lab results received in the last 36 hours for the patient. You can uncheck to exclude vitals.
- Under Active Medications, the Include active medications in summary is checked by default. You can uncheck to exclude active medications from the summary.
- Click the plus icon
 next to Physical Exam and select the physical exam template to add.
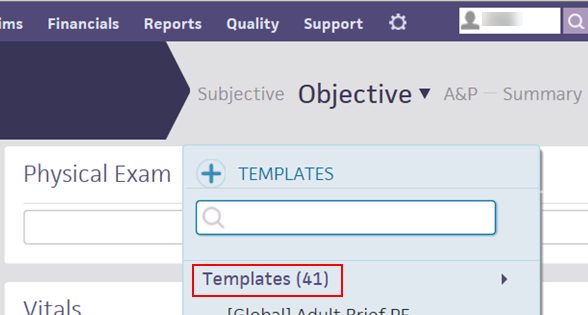
The physical exam template appears in the Physical Exam section. - Click each section to expand it and select your observations.
You can click:- All Normal if all sections appear normal.
- Clear to clear the observations you've selected.
- The blue arrow next to Clear to expand all sections.
- Enter any objective data in the Physical Exam text box.
- Review the patient's vitals. You can click the drop-down arrow next to Objective to view only the Physical Exam, Vitals, or Active Medications.
- Click Next. The A&P stage appears.
A&P
- Click the plus icon
 to search for and select an order to add. The selected order appears listed under the Assessment & Plan heading.
 - Click the order to expand it, and complete the order details in the fields provided.
- Check the checkbox at the top left corner of the order form, and click Sign Order.
- Click Next.
The Summary stage appears.
Summary
- Review each summaries to ensure that the patient's information is correct.
- Subjective
- Objective
- Assessment & Plan
You can delete a note before you sign, but you cannot delete unsigned notes.

- Click Sign Note. The progress note appears in the hospital chart in the Notes tab
 and in the Recent Notes section in the patient's briefing.
Note: The timestamp appears just below the Sign Note button.
You can click the timestamp to update the date and time, provided that the date you enter is within 30 days of the current date. When you update a timestamp, the note is marked "Late entry."
- In the patient's chart, click the arrow in the green workflow menu (at the upper right) and select Add Procedure Note. (The options available in the green workflow menu depend on your user role.)
- Click the plus icon
 and select a procedure template.
 - Complete the template and click Sign Note.
Note: The timestamp appears just below the Sign Note button.
You can click the timestamp to update the date and time, provided that the date you enter is within 30 days of the current date. When you update a timestamp, the note is marked "Late entry."
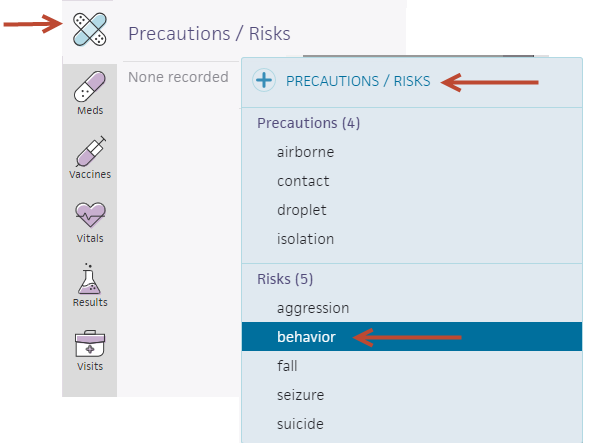
Adding behavior as a risk helps to ensure clinician safety when working with patients who exhibit abnormal behavior.
- In the patient chart, click the Diagnoses chart tab
 .
. - Click the plus icon
 next to Precautions/Risks.
 - Under Risks, select behavior.
- In the patient chart, click the arrow in the green workflow menu (at the upper right) and select Add Forms. (The options available in the green workflow menu depend on your user role.)
- Click the plus icon
 .
.
- Enter a free-text form in the field provided.
Tip: To save the form for later use, click the star icon, enter a shortcut name for the new form, and click Save.
- Click Done.
- Display the patient's chart: Click the athenaOne logo in a department that uses athenaOne for Hospitals & Health Systems to display the Patient List, and then click the patient's name in the Patient List. The patient briefing is the "front page" of the chart.
- In the patient chart, click the Find tab
 at the top of the list of chart tabs on the left side of the screen.
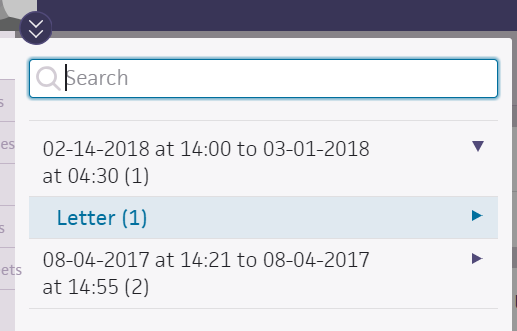
 - Select the arrow to the right of the stay you need, to view the associated documents.
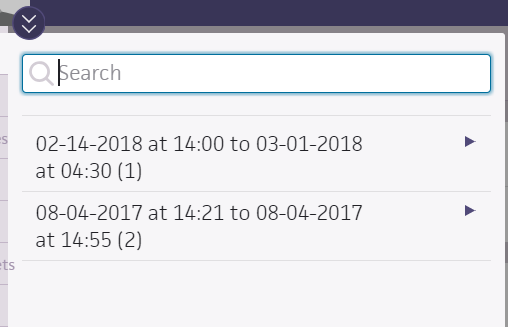
- Under the stay, select the document to view.
- Display the Patient Chart: Click the athenaOne logo in a department that uses athenaOne for Hospitals & Health Systems to display the Patient List, and then click the patient's name in the Patient List. The patient briefing is the "front page" of the chart.
- In the patient chart, click the Menu icon
 and select Chart export.
 - Select a date range to view documents related to the closed stay.
- Click the + next to Discharge Notes to expand the section.
- Select the document and click the right arrow
 .
. - Click Export Chart Sections in the upper right corner. The new print task appears, showing a preview of the printed material.
Note: To change the selected chart sections, click the edit link to add and delete chart sections. - Click Save at the bottom of the page.
Record Release Information
- Method — Select the method for sending the chart.
Depending on your selection, additional fields may appear. - Send to — Enter the recipient's name. You can enter a few letters to search for and select a clinical provider, or you can enter free text. Click Clear if you selected a clinical provider in error. (Removing the clinical provider also clears the Fax Number if you selected AthenaFax as the Method.)
- Fax Number — If you selected AthenaFax as the Method, enter the fax number.
- Attention — Enter free text. If the provider in the Send to field is not an individual, you can specify the person who should receive the fax.
Note: This field has a 200‑character limit, including spaces and carriage returns. If you enter more than 200 characters, an error message appears when you try to save your chart export. - Note — Enter additional information to include on the fax cover sheet.
- Scroll
down and carefully review the chart information to be faxed.
Important: It is your responsibility to review any release of protected health information (PHI) to ensure compliance with HIPAA, federal, and state regulations. Every document should be reviewed for PHI before printing and release. - If you need sign-off before completing this process, select the Leave In REVIEW option and select the username of the staff member who needs to review the task before printing or faxing. Click Save.
- Click the Submit option.
- Click Save.
- If you selected the print method, a
 Print
link appears at the top of the page. Click the
  Print
link to send the document to your printer.
Note: To delete the print task without printing, click the Delete option and then click Save. -
When you select the fax method, note that it is limited to the lesser of 80-pages or 100 MB. If the document exceeds these limits, the task is assigned to the user who created it to be reduced in size or submitted by an alternate method.
Note: If the Auto-Close Stays feature is enabled for the department, athenaOne automatically closes the stay after the prescribed number of days (marked "closed by ATHENA" and a timestamp), even if there are incomplete or unsigned notes. After the stay is closed, the provider who created the note can amend any incomplete notes. After a note is amended and signed, the provider's signature and timestamp appear in the addendum.
- In the patient chart, click the Notes tab
 .
. - Click OTHER next to Current Stay.
- Click SHOW ALL under the stay with the note that you want to sign. A list of notes expands under the stay.
- Click the view more icon
 next to the note closed by ATHENA that you want to sign.
 - Scroll to the bottom of the note and click the plus icon
 next to ADDENDUM.
 - Enter any additional information in the Addendum field.
The Sign Addendum button turns green
Tip: To save the text you entered as a text macro, click the star to the right of the text field.
Enter a short name for the macro in the Shortcut field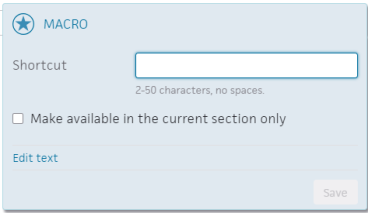
Click Save. - Click Sign Addendum in the upper right corner.
The information you entered in the Addendum field appears under Addendum with your signature and timestamp.
The original signature, "closed by ATHENA," and the original timestamp remains in the note.
- In the patient chart, click the Menu icon
 and select Add document.
 - Select the file to upload.
The Add Document window appears.
In the Add Document window
- Tie to Stay — Select an option to tie the document to a particular stay, or upload it to the to the chart without specifying a stay.
- Document Class — Select Admin or Clinical document.
Additional fields appear, depending on the document class selected. - Document Label — Search for and select the document label. (See also: Document Labeling).
- Date and Time (appears for Admin class) — Enter the document's date and time.
- Observation Date and Time (appears for Clinical Document class) — Enter a time and click the calendar icon
 to select a date.
 - Click Save (at the top of the form).
- In the patient chart, click the Menu icon
 and select Add document.
 - Select the file to upload.
The Add Document window appears.
In the Add Document window
- Tie to Stay — Select an option to tie the result to a particular stay, or upload it to the to the chart without specifying a stay.
- Document Class — Select Imaging/Diagnostic Result or Lab Result.
Additional fields appear. - Tie to Order — You can select an order to tie this result to.
- Clinical Order Type (appears if you did not tie the document to an order) — Enter the first few letters of the order type and select it from the matching list.
Note: If you select a clinical order type, the order type is used a label in the Results tab; otherwise, the result is labeled "Unknown" in the Results tab of the hospital chart. - Status — Select the status of the result.
Note: You can upload multiple result documents for the same order with the same status. - Observation Date and Time — Enter a time and click the calendar icon
 to select a date.
 - Click Save (at the top of the form).
Note: Results tied to a hospital stay or order appear in the Results tab of the chart, and can be found using the Find tab
  in the hospital chart.
Note: You cannot view a document in athenaOne after it is deleted. If you need a copy, print the document before you delete it.
- Click the Find tab
 in the patient chart.
 - Click the arrow next to the stay you need, and select the document to delete.
The document window appears. - Click the X icon
 in the upper right hand corner of the document.
The Reason field appears.
- Reason — Click the menu and select the reason for deleting the document.
- Click Delete.
Note: The reason, user, and time of deletion appear as a placeholder in the chart, notifying other users of the document's deletion.
Deleting lab or imaging results from a patient's chart requires the Inpatient Clinicals: Delete Lab Result and Inpatient Clinicals: Delete Imaging Result permissions. Note the following limitations:
- You cannot print deleted results.
- Deleted results do not appear in tracked lab result graphs and tables or in the Recent Results section.
- If you re-open a deleted result, you cannot print from the expanded view. Instead, the restore button appears to reactivate the result.
- Display the patient chart: Click the athenaOne logo in a department that uses athenaOne for Hospitals & Health Systems to display the Patient List, and then click the patient's name in the Patient List.
- Click the Results tab
 at the left.
 - Click the flowsheet icon
 for the test result that you want to delete.
Note: If applicable, select the Document view. - Click the X icon
 .
.
A message appears, warning that you cannot print the document after it is deleted.
If you need a copy, print it before you delete. - Reason — Enter the reason for deleting the result.
- Click Remove. The result appears with a strikethrough in the Results chart tab.
Note: If there are multiple results for a single order, deleted results appear at the bottom of the History section.
- Display the patient chart: Click the athenaOne logo in a department that uses athenaOne for Hospitals & Health Systems to display the Patient List, and then click the patient's name in the Patient List.
- Click the flowsheet icon
 for the test result you want to restore.
Note: If applicable, select the Document view. - Click the restore icon
 .
.
The result is now re-opened, and you can print the test results.
Note: If there are multiple results for an order, the result returns to the correct order in the History section.
- Display the Report Library: On the Main Menu, click Reports. Under General, click Report Library.
- From the Go to menu at the upper right, select Custom Report, and click Go.
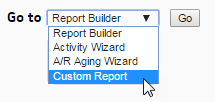
The Custom Reports page appears. - Name — Enter the name for the deleted tests report.
- or custom-report object name — Enter Reports::Custom::Clinicals::Results::DeletedTests.
- Bind Variables — Enter TESTCATEGORY.
- Click Save.
A message appears confirming the saved report.
- Display the Report Library: On the Main Menu, click Reports. Under General, click Report Library.
- Click the Other tab.
- In the Practice Reports section, click run to the right of your deleted tests report.
- Test Category — Select the type of deleted tests to search for:
- Lab Tests
- Radiology Tests
- Click Run Report.
-
In the patient chart, click the Diagnoses chart tab at the left side of the screen.
- Click the plus icon
 in the upper right corner.
 - Enter the diagnosis you want to record and select it from the list.
- Check the Primary diagnosis box if applicable.
- Click the calendar icon
 to select an onset date if the default date is not correct.
 - Click NOTE to add a note about this diagnosis (optional).
- Click Add.
Note: You can also record a patient's diagnosis when adding a discharge order.
The hospital chart is the electronic record for a patients hospital visits and stays, and may include uploaded historical medical records and documents from other sources. The chart includes the following components:
- Patient banner — The patient banner, which appears at the top of most patient-specific pages, includes a patient photo, patient surname in uppercase, and basic demographic information.
- Briefing — The Hospital Chart briefing — the "front page" of the chart — displays pertinent patient information, such as recent vitals, allergies, precautions and risks, and current medications.
-
 Find tool — Find documents tool in the patient's chart
Click chart tabs at the left side to display the chart sections:
The Hospital Chart briefing — the "front page" of the chart — displays pertinent patient information, such as recent vitals, allergies, precautions and risks, and current medications.
The Recent Vitals section displays vitals from the current stay that have a reading date within the last 36 hours:
- Body Temperature
- Blood Pressure
- Pulse
- Respiratory Rate
- Pain Scale
- O2 Saturation
- Weight
- Height
- Waist Circumference
You can click the Menu icon ![]() at the upper right of the briefing to display a list of actions that you can take within the patient chart.
at the upper right of the briefing to display a list of actions that you can take within the patient chart.
To view the coding view of the chart, display the Visit - Billing view or the Visit - Patient Access view and click Open Coding View of the Chart.
You must have the Hospital Coder user permission to access the coding view of the hospital chart.
The documents in the coding view of the chart are organized into tabs by level of care per visit. Each tab name displays the type of level of care and the dates of service for that level of care. This makes it easier to code accurately. Depending on the patient's level of care, these tabs may appear:
- Clinic
- Emergency
- Inpatient
- Inpatient - ICU
- Inpatient: Intensive care (ICU)
- Inpatient: Newborn
- Inpatient: Other
- Inpatient - Stepdown
- Intermediate care (I-III)
- Intermediate swing
- Observation
- Outpatient
- Outpatient - Reference lab
- Psychiatric
- Skilled nursing (SNF)
- SNF Intermediate I
- SNF Intermediate II
- Swing bed
Note: This is a global list of athenahealth levels of care. One or more of these types may not be available to your organization.
When more than one user views the same patient chart simultaneously, a blue bar appears as an indicator.
If more than one user attempts to edit the same chart section at the same time, a multi-user conflict message appears. For example, two nurses cannot simultaneously update the same patient's MAR.
However, more than one user can update the same chart if the updates are in different chart sections. For example, a nurse can update the MAR for a med administration while another nurse updates a physical therapy note in the same chart.
athenaOne alerts you when another user has made conflicting changes to the document that you are working in. When you click Save, the Multi-User Conflicts page appears. You determine the best version of the document to keep, and the document is updated accordingly.
Both User A and User B click the Orders/Rxs/Auths work queue of the clinical staff Inbox and notice that patient John Brown needs a renewal of his recent prescription.
- User A clicks John's order in the worklist to open it.
- User A clicks the prescription document # link to open the document view.
- User A updates the prescription document as follows:
- Medication to Renew — User A selects ranitidine 300 mg capsule.
- Sig — User A selects 1 capsule.
- Prescribed Qty — User A enters 5.
- User A clicks Save.
- User B opens John's prescription renewal order at the same time as User A and clicks the prescription document # link to open the document view.
- User B updates the prescription document as follows:
- Medication to Renew — User B selects ranitidine 300 mg capsule.
- Sig — User B selects 3 capsules.
- Prescribed Qty — User B enters 3.
- When User B clicks Save, the Multi-User Conflicts page appears.
The Multi-User Conflicts page displays the prescription renewal that User A saved, as well as the prescription renewal that User B was in the process of saving. The differences in the renewals are highlighted.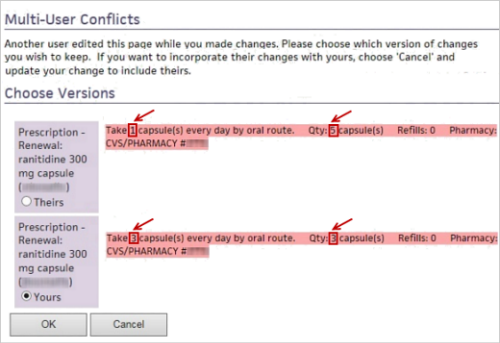
- If User B determines that her version of the prescription renewal is valid, she clicks the Yours option. If User B decides to accept the prescription renewal made by User A, she clicks the Theirs option.
- User B clicks OK.


 —
—  —
—  —
—  —
—  —
—  —
—